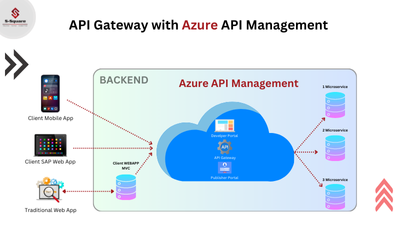
Please find the below steps to find out the Schema name of the Query Subject or Report Item:
-
- Open report with report studio
- Go to the Source Tab and select the Query subject or data item as shown in below screenshot
- Right click on the Query subject or data item to know from which schema it is coming from
- Click on the Lineage property as shown in the below screenshot.

-
- Here it opens a separate window which provides the Business view and Technical view of the selected item coming from the Data Source.
- Under Business View tab àData Sources, Data Source Name will be available.

-
- After getting the Data Source Name, In Cognos Connection, Go to Launch à Click on IBM Cognos Administration

-
- Click on Configuration Tab, On Data Source Connections, All the Data Sources will be available.

-
- Please follow the below steps on Configuration Tab
- Click on the data Source name.
- It will be redirected to Data Source Connection name:
- Please follow the below steps on Configuration Tab

-
- Click on the Data Source Connection (which lies inside the Data source name)

-
- Click on the properties of the Data Source Connection, As shown in the screenshot.

-
- Click on the Edit Signon under Signon Tab.

-
- Here a window opens, where it consists of UserID and Password. The user ID is here as Schema name: